Article contents
- Evidence and scope
- Illustration
- Process
- Multiple scales and multiple timeframes are different designs
- Join on availability, not the original extreme
- Numerical timing and a valid setup that still loses
- Freeze the role and anchors of each scale
- Do not count the same volume repeatedly
- Measure the incremental value of higher-timeframe context
- Common pitfalls
- Practical checklist
- Frequently asked questions
- Research sources
Evidence and scope
The technical references explain timeframes, higher-timeframe data and temporal joins. They do not establish that adding more timeframes automatically improves win rate or profitability.
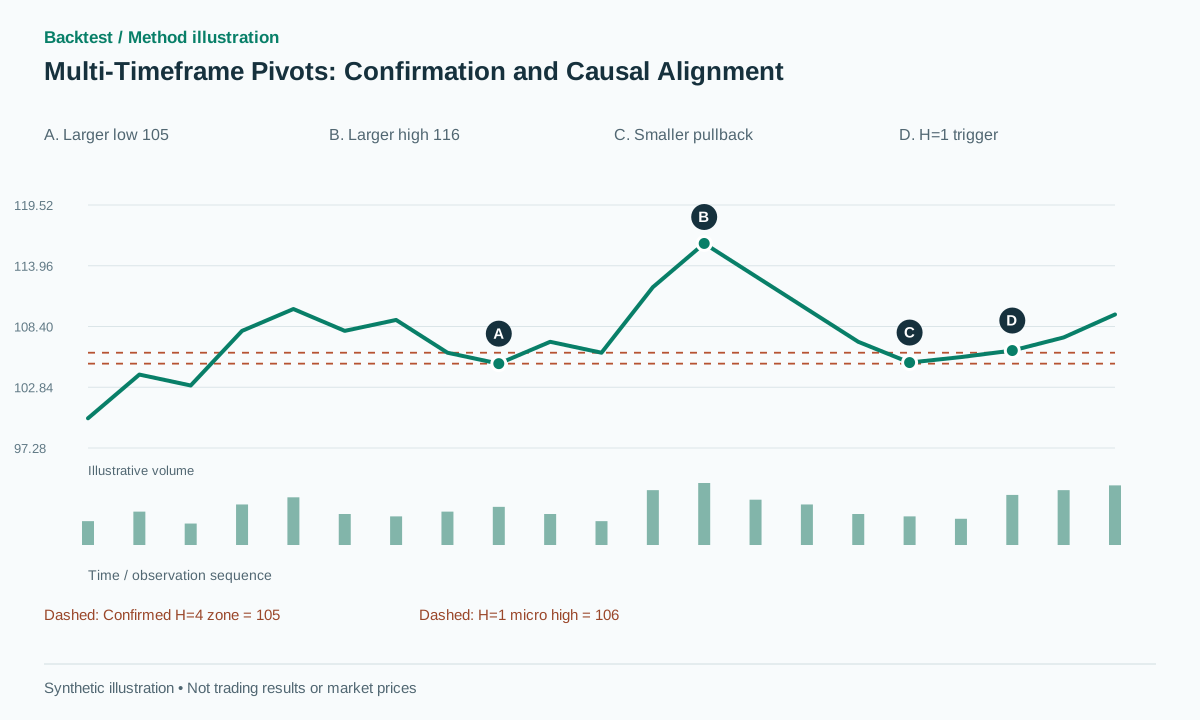 Open full-size illustration
Practical workflow
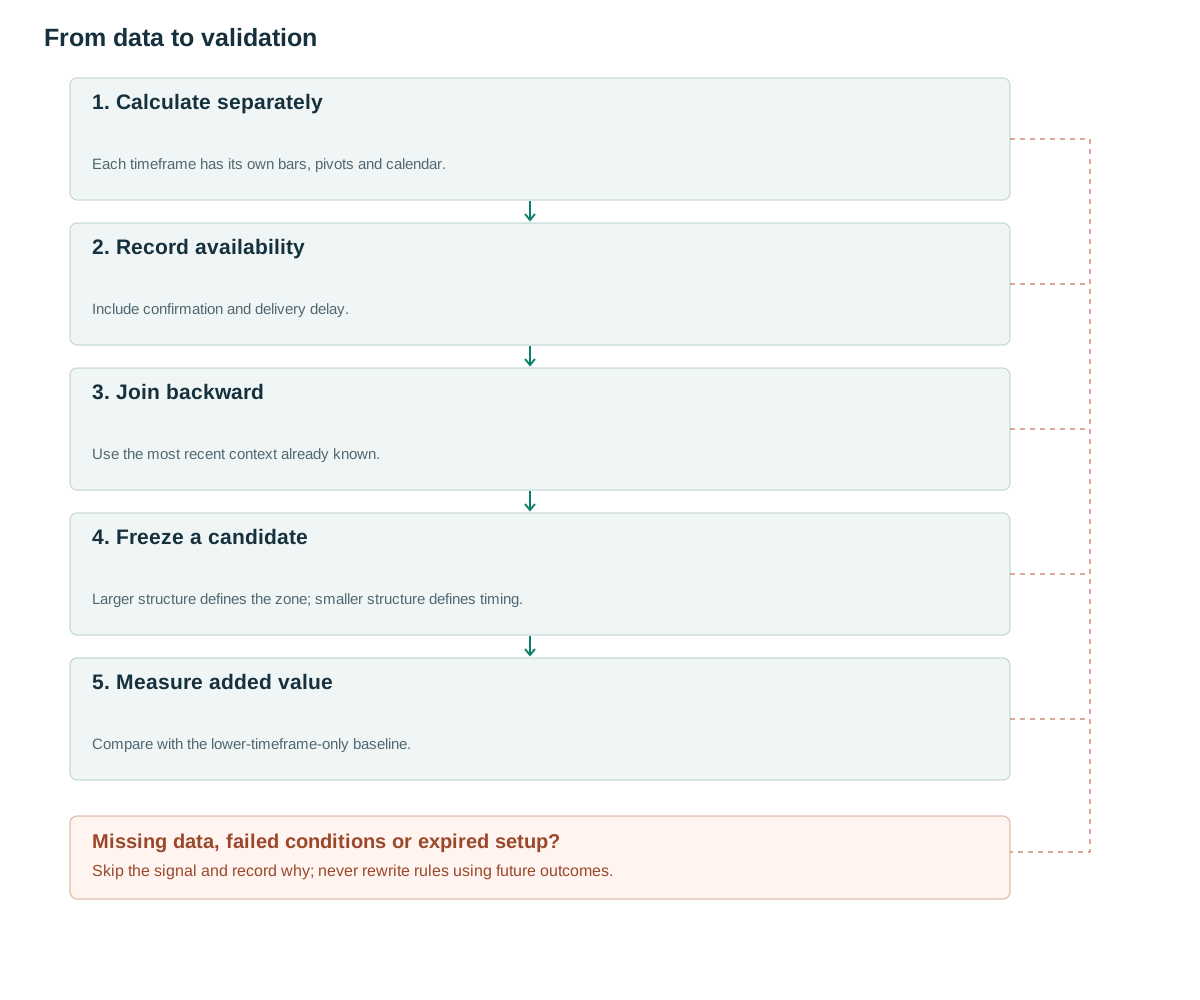
- Calculate separatelyEach timeframe has its own bars, pivots and calendar.
- Record availabilityInclude confirmation and delivery delay.
- Join backwardUse the most recent context already known.
- Freeze a candidateLarger structure defines the zone; smaller structure defines timing.
- Measure added valueCompare with the lower-timeframe-only baseline.
Multiple scales and multiple timeframes are different designs
Multiple scales can mean running pivot radii of 2, 5 and 10 on the same H=1 series. Multiple timeframes mean separately calculating H=1, H=4 or daily bars. These are not equivalent: aggregating four H=1 bars into H=4 discards their internal sequence. An H=1 pivot with radius eight need not match an H=4 pivot with radius two.
TradingView defines bar timeframes [1] and explains confirmed higher-timeframe requests [2]. The proposed protocol assigns H=4 only to context and H=1 only to triggering. A trade cannot choose whichever timeframe makes its historical outcome look most convincing.
Define what context is supposed to contribute. It might identify a direction, a reference zone or a volatility regime. Combining all three immediately makes it difficult to discover which component helps. Begin with one role, compare against the lower-timeframe baseline and add complexity only as a registered experiment.
Join on availability, not the original extreme
Each pivot needs occurred_at, confirmed_at and available_at. The last field includes data-delivery and processing delay when relevant. At an H=1 decision time t, use only an H=4 state whose available_at≤t. With an H=4 pivot requiring r=2, the extreme bar closing is insufficient: two more H=4 bars must also close.
A backward pandas merge_asof chooses the latest right-hand record no later than the left-hand key [3]. Join on available_at, group by instrument and venue, sort timestamps and apply a maximum context age. A nearest join can select a future observation and is unsuitable for this causal lookup.
Equal timestamps require an explicit event order. Either the H=4 update is completed before the H=1 decision, or a processing delay makes it available only afterward. Wall-clock equality does not establish that the data were usable. Also distinguish the latest raw H=4 pivot update from a complete structural state containing the required confirmed highs and lows.
for each closed H1 bar t:
    h4 = latest_state(where available_at <= t, same_instrument=True)
    if h4 is None or h4.age > max_context_age: continue
    up = h4.H2 > h4.H1 + eps and h4.L2 > h4.L1 + eps
    near_support = abs(H1.low[t] - h4.last_low) <= zone_width
    if up and near_support: create_frozen_candidate(h4.anchor_ids, t)
    if candidate and H1.close[t] > candidate.micro_high + buffer:
        emit(signal_at=t, context_available_at=h4.available_at)
# Use only a micro_high confirmed before the trigger.
Numerical timing and a valid setup that still loses
Suppose the H=4 bar containing a low closes at 12:00 and the pivot needs two right-side bars closing at 16:00 and 20:00. That low cannot support an H=1 order at 13:00. It enters the context only after the 20:00 data are available. If delivery takes two seconds, a decision at 20:00:00 must still use the older state.
Synthetic valid setup: already-known H=4 highs progress 110→116 and lows 100→105. A proposed support zone is 104.7–105.3. H=1 touches 105.1 and later closes at 106.2 above an already-confirmed micro high of 106. Entry at 106.3 with stop 104.7 has 1.6 points of planned risk; a research target at 109.5 is 2R before costs.
Failure path: the H=1 breakout occurs but price subsequently falls through 104.7. The H=4 uptrend was a description of known history, not a guarantee that 105 would hold. Switching to H=8 after the loss to argue that context was actually bearish would change the rule after observing its outcome.
A timing fixture should move the same H=1 trigger a few seconds before and after the H=4 available_at timestamp. The permitted context must change only at the declared boundary. Another fixture with a missing H=4 bar should keep the new pivot unconfirmed rather than substituting a later completed bar without recording the gap.
Freeze the role and anchors of each scale
A complete configuration assigns the larger scale a zone, the smaller scale a trigger and a predefined stop policy. A small-scale stop may create a tighter initial risk distance but be vulnerable to ordinary movement inside the larger structure. A large-scale stop changes position size and often holding time. Neither should be selected retrospectively per trade.
When creating a candidate, store its context anchor IDs, prices, zone width, context availability and the lower-timeframe micro high already confirmed at creation. A newly arriving context may invalidate an unfilled candidate under a fixed rule, but must not rewrite the reasons for an earlier signal.
The pseudocode is a structural sketch: candidate activation and trigger evaluation should have distinct timestamps. In a strict later-bar variant, require t>candidate.created_at and a micro high confirmed no later than creation. Define what happens if the creation bar has already crossed that high. Either reject the stale candidate or register an immediate-activation variant.
Set a TTL in elapsed trading time or H=1 bars. A very old H=4 state is not fresh evidence simply because it remains the latest record. Context expiry, missing data and a genuine bearish transition should have separate reason codes so the opportunity loss from each policy can be measured.
Do not count the same volume repeatedly
H=4 volume contains the activity of its constituent H=1 bars. Rising H=1 and H=4 volume therefore are not two independent observations. A score can count satisfied conditions, but arbitrary weights do not turn that score into a calibrated probability of winning.
A more focused feature compares H=1 pullback activity against a same-time H=1 baseline while leaving H=4 structure frozen. If partial H=4 volume is used, compare it with historical partial volume after the same elapsed number of minutes. Full historical H=4 volume cannot be compared fairly with a current H=4 bar that has only just opened.
The input schedule matters as much as the formula. Volume repairs, delayed bars and different session definitions can cause the same nominal H=4 period to aggregate differently from four local H=1 bars. Keep aggregation provenance and compare totals as an integrity check before evaluating any supposed confirmation.
An ablation should add one volume feature at a time with the same candidate set and execution rules. Examine whether the improvement survives controls for time of day, volatility and liquidity, rather than assuming multiple green volume conditions provide independent confirmation.
Measure the incremental value of higher-timeframe context
Compare the identical H=1 detector in three branches: no context filter, H=4 direction only, and H=4 direction plus proximity to its zone. Keep risk, execution and test dates consistent. Report rejected signal count, exposure and net expectancy because a filter can improve win rate simply by changing the subset of trades.
Run fixtures across H=4 boundaries, scheduled closures, daylight-saving changes and missing observations. Replay in data-receipt order and compare with the batch temporal join. If batch processing identifies H=4 structure earlier than replay, repair the join before adding another indicator.
Compare a single-timeframe, multiple-scale baseline as well. Its simpler synchronization may explain much of the apparent benefit without requiring a second bar calendar. Register timeframe pairs and maximum-age settings as research trials, and freeze them before the final test.
Report stale-context failures separately from valid-context losing trades. The former may reveal a synchronization or expiry policy issue; the latter concerns the predictive value of the hypothesis. Clear classification prevents every loss from being explained away by selecting another scale.
Common pitfalls
Giving H1 the final H4 close early
Forward-filling the completed H=4 value into all its constituent H=1 bars leaks information.
Ignoring the pivot delay
A completed H=4 bar still does not confirm an extreme requiring additional right-hand bars.
Changing context after a losing trade
Choose the contextual timeframe before the evaluation period and retain failed configurations.
Checklist before using this method
Check each item after verifying it on your data. Progress is saved in this browser; it does not certify a profitable strategy.
Frequently asked questions
Do three bullish timeframes make a signal three times stronger?
No. They share the same underlying price path. Incremental information and any probability calibration must be measured out of sample.
Is one timeframe preferable for simplicity?
A single timeframe with multiple scales is a useful baseline. Add another timeframe only for a defined purpose and test whether it improves the relevant outcome.
Research sources
Each source supports the definition or evidence described beside it. The pseudocode, synthetic examples and proposed parameters require separate validation.
- Pine Script: TimeframesTradingView. Read timeframe definitions and units. Checked: .
- Other timeframes and dataTradingView. Read examples of requesting confirmed higher-timeframe data. Checked: .
- pandas.merge_asofpandas. Read backward matching, tolerance and exact-match behavior. Checked: .
Related methods
Risk note
This content supports education and research design, not financial advice. Backtest is historical simulation, does not guarantee future performance and does not place real trades. Methods in this library are not automatically features available in the app. See methodology and learning center.
Validate rules before risking real capital
Check app support, data and individual simulated trades; advanced detectors may require a separate implementation.
Download Backtest on the App Store